


The following guide includes general guidelines.
Please contact our technical department for more specialized information according to the climatic conditions of your area.
We highly recommend you to read the whole manual before you order or sell this system.
• We recommend using optical leveler (not laser).
• The cornerstones in the kit cut for you ( if you order them pre-cut). So be careful about handling these stones. They can be broken easily on the corners.
• The majority of our stones are natural stones, so you may notice differences in colors comparing to your samples.
Important
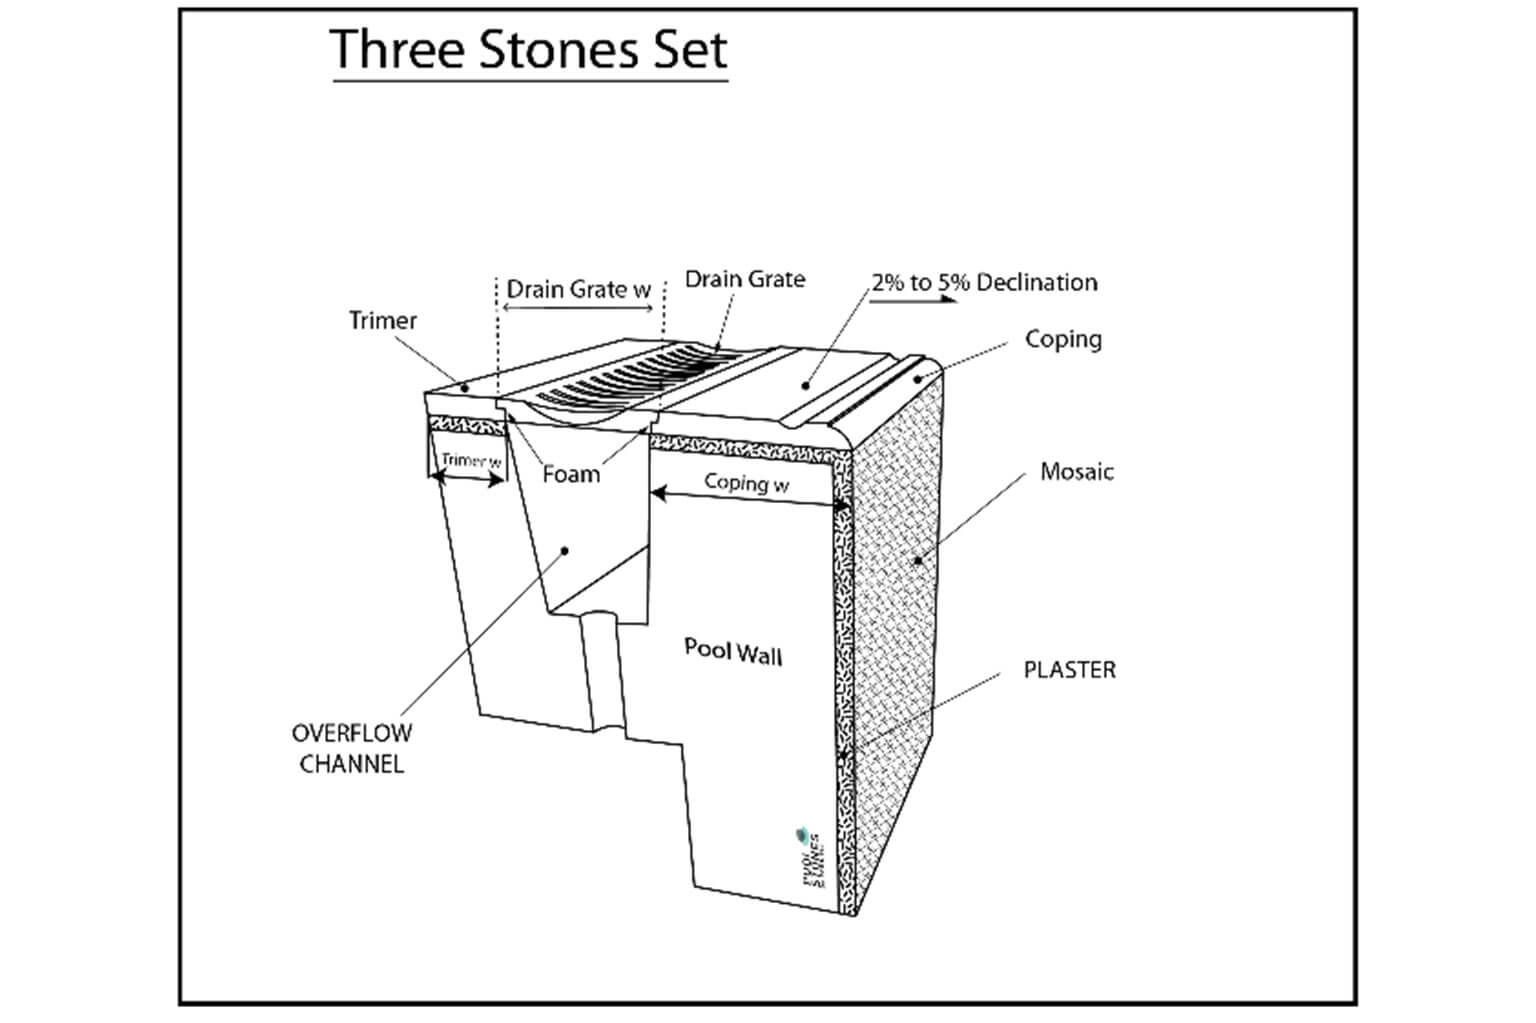
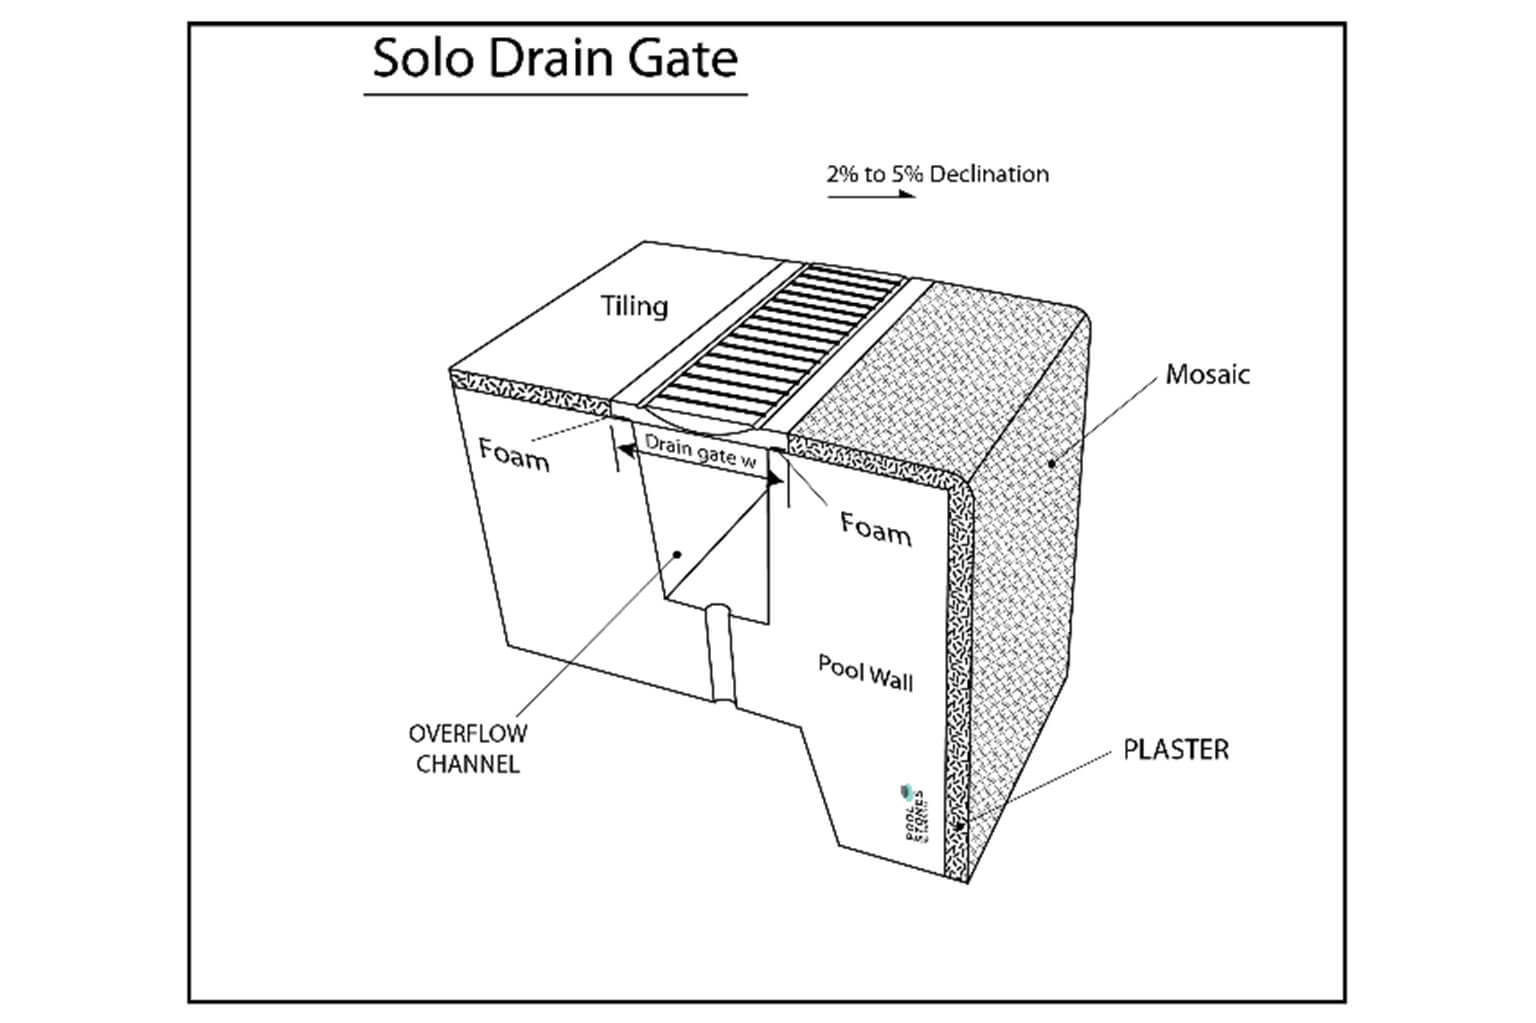
Please note that the drain grat system must be in declination toward the pool) the pool side is the lower side) in 2% to 5% slope. If you fail to do this, it will make the system not performing as we design them.

Ordering
- We highly recommend the measurement to be done after the plaster finished.
- Please remember to measure the long side of the perimeter of the stones.
- Please send your order with some photos ( so our expert will have a look and advise if necessary ) to our mail: info@poolstones.com
Measuring
- Choose your system.
- Three stones set ( coping +drain grate+ trimer )
- Solo drain grate stones (drain grate)
Please measure the diagonals of the pool. If it is not the same, you should order the corners cut site.
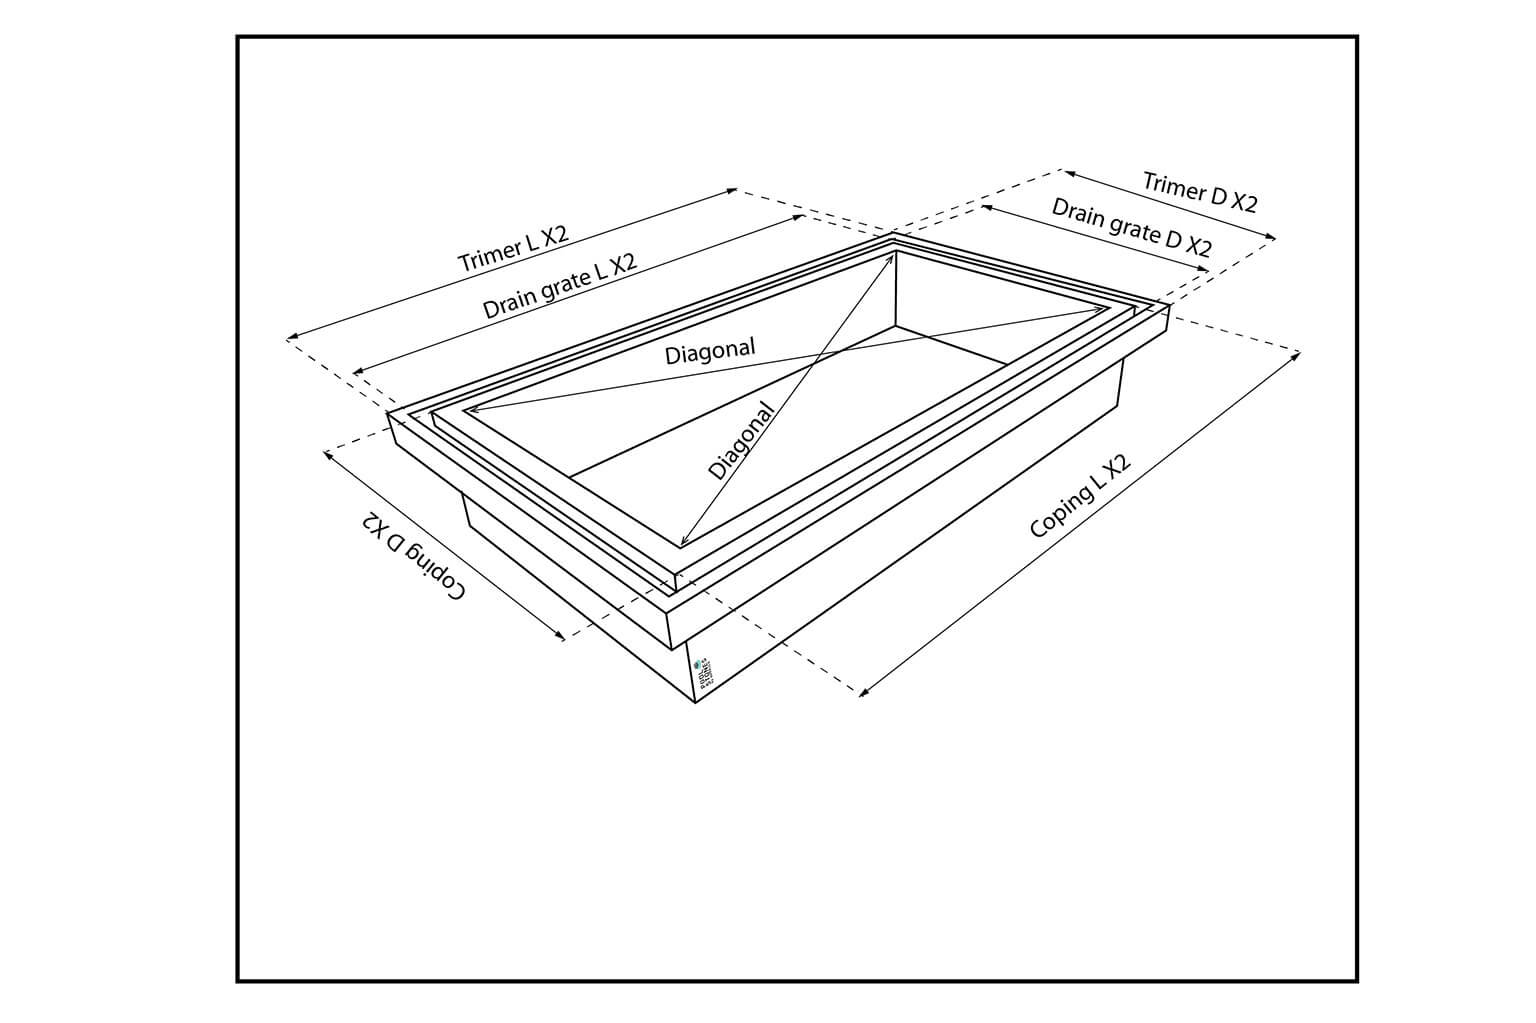
- See this drawing for measuring stage :
- Total length of the Coping
- Total length of the drain grate
- Total length of the trimer
Installation
- Before you start to tile, check the plaster work that its as you ask to have. Including the declination, the size fit the stones. The pool channel is treated. The balance room holes are clear.
- Be sure to have all tools and materials needed for the gluing of the pool.
- Check the label on the box to be sure it’s your order.
- Open the box close to the installation area so it will be easy for you to carry the stones.
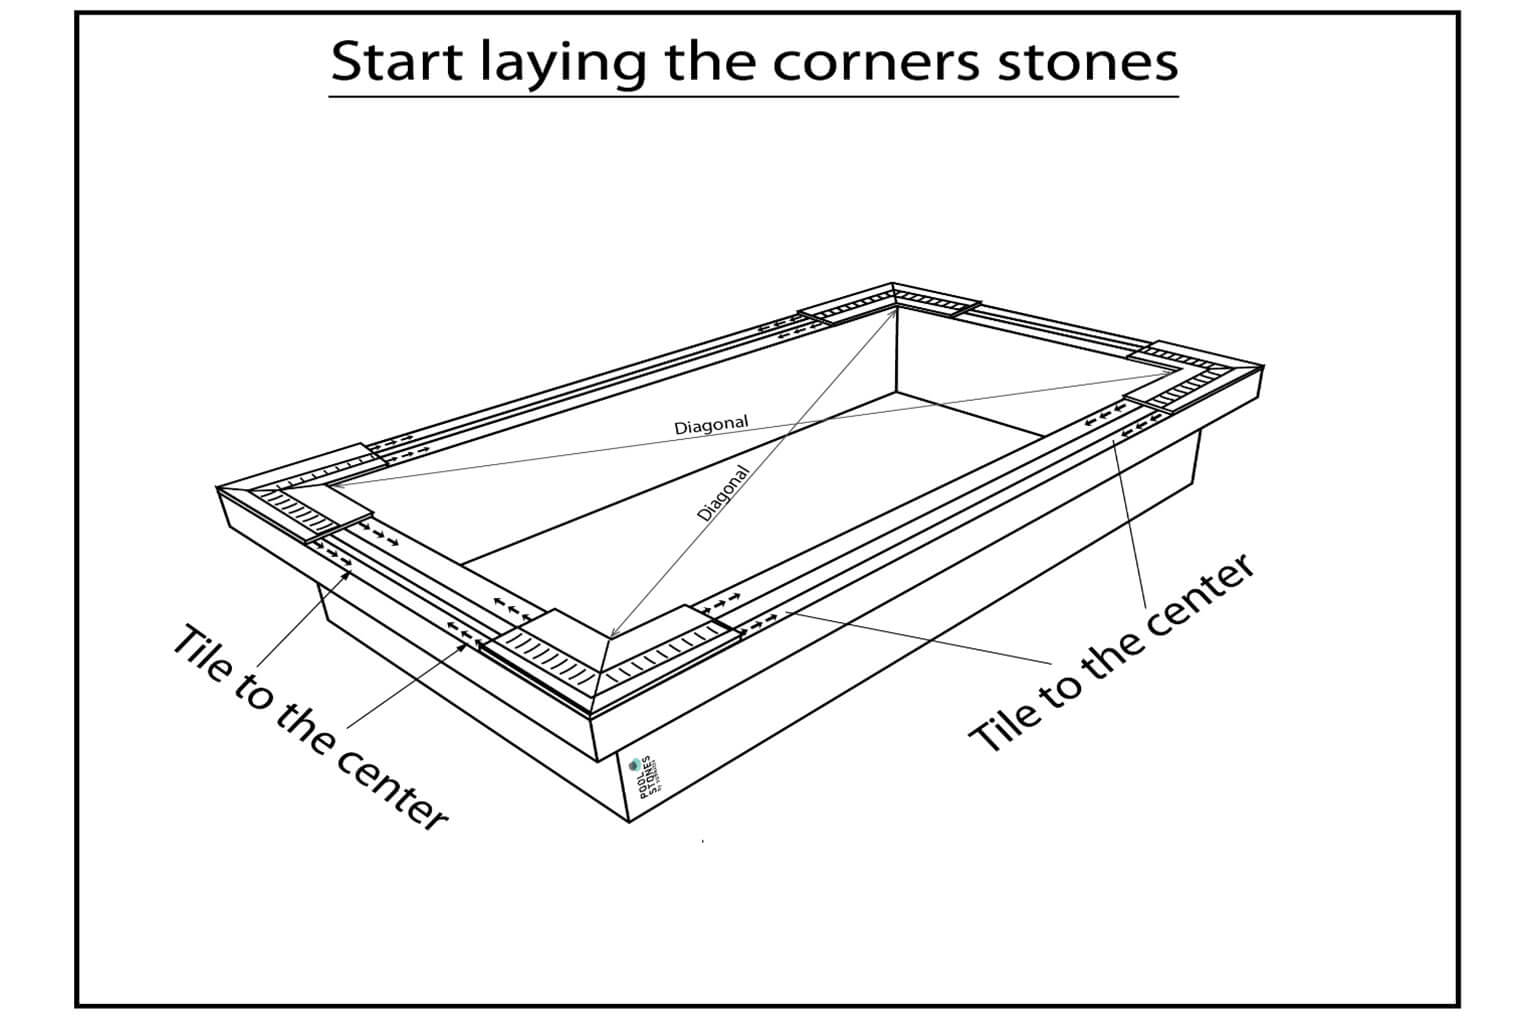
- Start by laying on the pool corners without using the glue – the coping corners from the stones box you should have eight pc if you order 45° cut, (we usaly put all corners stones on the top of all layers on the box)
- Measure the diagonal of the opposite corner stones (see drawing) to be the same when you are sure about the right location. Mark it on the plaster, so that when you take it out for gluing, you will know how to return them to the same place.
- Please note that the three stones together will need to decline towards the pool in 2%-5% (see drawing ). If you fail to do this declination, the system will not work as we designed it for you.
- We recommend using an optical leveling system for the heights and the declination of the stones.
- Use glue. We recommend gluing the stones only with the proper material for swimming pools.do not use glue that content quartz inside.
- Use corner drain grate stones to locate the right place for the trimer corners and glue them.
- Repeat this in all corners.
- Leave the drain stones on their place until the coping and the trimer stones are set and dry.
- After you ‑finished all the corners, you can continue towards the center of each side of the pool.
- Please note that we recommend to do the coping and trimer stones with the 3mm plastic crosses so it can be“extended“.
- We can supply longer drain stones to cover this gap of 3 mm you need to order it.
- We recommend you measure the last 3-4 stones in the middle so that you will be able to cut more stones if the middle stones are too small.
- Once you ‑finish tiling the stones, you can add the drain stones but before that, you need to glue the special anti-chlorin foam which we supply with the stones.
- Let the glue dring according to the label. It’s highly recommended to apply sealer ( you can order it with the stones.
- Now you can add water and operate the system.
Instructions for installing an engineering marble overflow
• We have leveled the surface of the pool edges, where the copings will be installed with the use of leveling cement, since the use of adhesive is not recommended in cases in which thickness is >10 mm.
• In order for the overflow copings to be correctly installed, the use of a laser alignment tool or a laser level is requested. The common spirit level or a tubular spirit level cannot guarantee the simultaneous pool overflow to all the overflowing sides.
• A thorough pre-measurement of the pool may be necessary because, for instance, if 4mm joints instead of 3mm joints are used, that will result in the same alteration to the number of pieces required for one side of the pool.
• We use a thin rope which stretches perfectly in order to level the surface and ensure that the corner pieces are installed first and are whole, without any corner cuts (preventing jagged edges).
• Pieces’ cuts should be in the center of each side of the pool in order for the pieces to be equally shared and minimize the chances of placing small additional items in the corners.
• The engineering marble bonding cannot be achieved with the use of conventional adhesives, given that its absorbance is zero while its elasticity which derives from the large proportion of resin (7%) contained in engineering marbles composition, makes
the copings move slightly during the summer months.
For this reason, we recommend either the use of a MAPEI-type elastic adhesive οr the use of a more expensive epoxy adhesive, MEGAPOXY.
• Increased attention is needed regarding the joints. There should be a 3mm joint between the copings and every 4-5 meters there should be an 8-10mm joint.
• The small joints are puttied with normal acrylic or epoxy putty, while the big expansion joints are puttied with elastic
First the placement of the copings along the pool perimeter is completed and then the installation of the external trimmer begins.
• The grate is the last element to be installed, and only one grate piece is used as a guide for the proper installation of the trimmer.
• The distance between the 3 zones –coping, grate, trimmer-should be 1-2 mm.
• The “Armaflex” anti-vibration adhesive tape should be placed between the drain grate and the adjacent pieces, either beneath the grate or even better on to the coping and the trimmer rebate, always on a dry and clean surface.
