


Installation Instructions and Fitting Responsibility The products when shipped to the customer are accompanied with printed instructions and sketches in English language. Further, they are filed digitally in the project’s file for every use.
Starting from the detailed Packing List that accompanies each order and is linked to the pallet label, the customer shall also be informed digitally how to fit specially curved parts, as well as, for the fitting details shown in sections.
If the parts are accompanied with insulating tape (Armaflex) which much be placed underneath the marble grate, or, with the lifting hook of the marble grate, there are additional instructions included.
As part to this service, please note that we respond with great pleasure when clients ask us to recommend fitters or installation experts- especially in Greece – where the travel cost is relatively low.
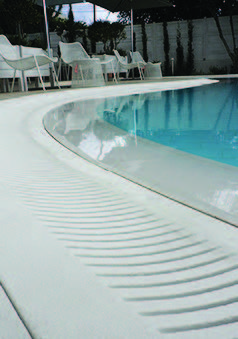
Instructions for installing an engineering marble overflow
• We have leveled the surface of the pool edges, where the copings will be installed with the use of leveling cement, since the use of adhesive is not recommended in cases in which thickness is >10 mm.
• In order for the overflow copings to be correctly installed, the use of a laser alignment tool or a laser level is requested. The common spirit level or a tubular spirit level cannot guarantee the simultaneous pool overflow to all the overflowing sides.
• A thorough pre-measurement of the pool may be necessary because, for instance, if 4mm joints instead of 3mm joints are used, that will result in the same alteration to the number of pieces required for one side of the pool.
• We use a thin rope which stretches perfectly in order to level the surface and ensure that the corner pieces are installed first and are whole, without any corner cuts (preventing jagged edges).
• Pieces’ cuts should be in the center of each side of the pool in order for the pieces to be equally shared and minimize the chances of placing small additional items in the corners.
• The engineering marble bonding cannot be achieved with the use of conventional adhesives, given that its absorbance is zero while its elasticity which derives from the large proportion of resin (7%) contained in engineering marbles composition, makes the copings move slightly during the summer months.

For this reason, we recommend either the use of a MAPEI- type elastic adhesive or the use of a more expensive epoxy adhesive, MEGAPOXY
• Increased attention is needed regarding the joints. There should be a 3mm joint between the copings and every 4-5 meters there should be an 8-10mm joint.
• The small joints are puttied with normal acrylic or epoxy putty, while the big expansion joints are puttied with elastic putty which can absorb contractions and expansions.
• First the placement of the copings along the pool perimeter is completed and then the installation of the external trimmer begins.
• The grate is the last element to be installed, and only one grate piece is used as a guide for the proper installation of the trimmer.
• The distance between the 3 zones –coping, grate, trimmer- should be 1-2 mm.
• The “Armaflex” anti-vibration adhesive tape should be placed between the drain grate and the adjacent pieces, either beneath the grate or even better on to the coping and the trimmer rebate, always on a dry and clean surface.
DO AND DONTS FOR POOLSTONES PRODUCTS
- Pool products made of natural and artificial stones are not installed in the same way as marbles for floors.
- It is strongly recommended to look for workshops with experience in the installation of pool products made of natural stones or artificial marble.
- Regarding construction materials, cement mortar, adhesives and joints, please ask the project engineer to indicate the appropriate product, which is available in your area, according to the following instructions.
- Great attention should be paid to the cement mortar substrate to be made under pool specifications, which should have great cohesion and structural stability.
- It is recommended for the cement mortar substrate, the use of materials that strengthen the mechanical strength of the cement mortar (e.g. polypropylene fibers and resin), ask for the advice of the supervising engineer of the project.
- Avoid high compartmentation cement mortar (coarse-grained materials).
- Natural or artificial rocks outdoors, due to strong weather conditions and sunlight, must be glued with high quality elastic adhesives.
- For joints, high quality putties able to withstand linear rock expansions, sunlight and extreme weather conditions should be used. Attention!! In case you use epoxy putties, apply them in the appropriate way so as not to stain the rocks, as they cannot be cleaned afterwards.
- Special attention should be paid to the width and design of the joints, so that they can receive the linear expansions of the marbles, depending on the geographical area and the dimensions of the pool and the surface of the rocks.
- Putties for joints should be applied to well-cleaned rocks and in the entire depth of the joint.
- For the preparation of both the putty and the adhesive, follow the manufacturer’s instructions (especially in relation to the ratio of the materials and the range of their application temperature).
- We emphasize that the installation of dark-colored marbles requires more attention to environmental conditions, especially during the summer months. Due to the high sunlight, dark- colored stones contract and expand to a greater extent than light- colored stones. This should be taken into account by the project manager throughout the installation of both the stones and the joints. It is recommended to protect the rocks from sunlight (e.g. to be covered) during installation and before grouting and until the installation of marbles and/or stones is completed.
- Frequent monitoring of the concentrations of the pool chemicals, so that the joints and the stones do not corrode.
- Waterproof treatment is highly recommended for all natural stones.
- Adhesive is recommended for the installation of the products since mud is likely to cause various stains including salts stains.
- In order to prevent marble pool products’ erosion:
- Pool’s water should be kept within a pH level of 7.2 to 7.6 throughout the day
- The level of the pool water’s total alkalinity should be between 80ppm and 140 ppm
- The chlorine levels should be lower than 5ppm
- Before using chemical products in the pool channels, make sure to remove the drain grates first
- The hardness of the water should be between 200 to 250 ppm .
